Fork me on GitHub

React+webpack4+Babel7 脚手架搭建过程(一)

第一篇主要是 webpack babel eslint

webpack

首先新建个空的文件夹并通过 终端进入(后续所有操作基于终端)

1
mkdir quick-start && cd quick-start

Webpack 的安装需要借助于 npm ,所以我们您需要创建一个 package.json

Package.json 是一个标准的 npm 说明文件,里面保存着当前项目的基本信息,项目依赖以及自定义脚本任务等。

终端中使用 npm init 命令创建 package.json

执行 npm init 命令依次输入项目信息,或者直接 npm init -y 跳过这些信息的输入

1
2
3
4
5
6
7
8
9
10
11
12
13
14
15
npm init -y
## 执行后得到如下信息
{
"name": "quick-start",
"version": "1.0.0",
"description": "",
"main": "index.js",
"scripts": {
"test": "echo \"Error: no test specified\" && exit 1"
},
"keywords": [],
"author": "",
"license": "ISC"
}

准备工作完成,开始安装 webpack

webpack 4之后分成了 webpack 以及 webpack-cli 两个依赖,所以我们依次安装

1
npm i -D webpack webpack-cli

接下来我们需要 创建一些文件和文件夹

当前目录下创建 src dist​ 两个文件夹 并在 src 里面创建两个文件 index.js index.html

1
mkdir dist src && touch src/index.js src/index.html

webpack 4 之后打包默认会寻找 src/index.js 作为默认入口,可以直接终端输入 webpack 来查看打包

C62FDD0D043AF76EA53BBEC441315EA4.jpg

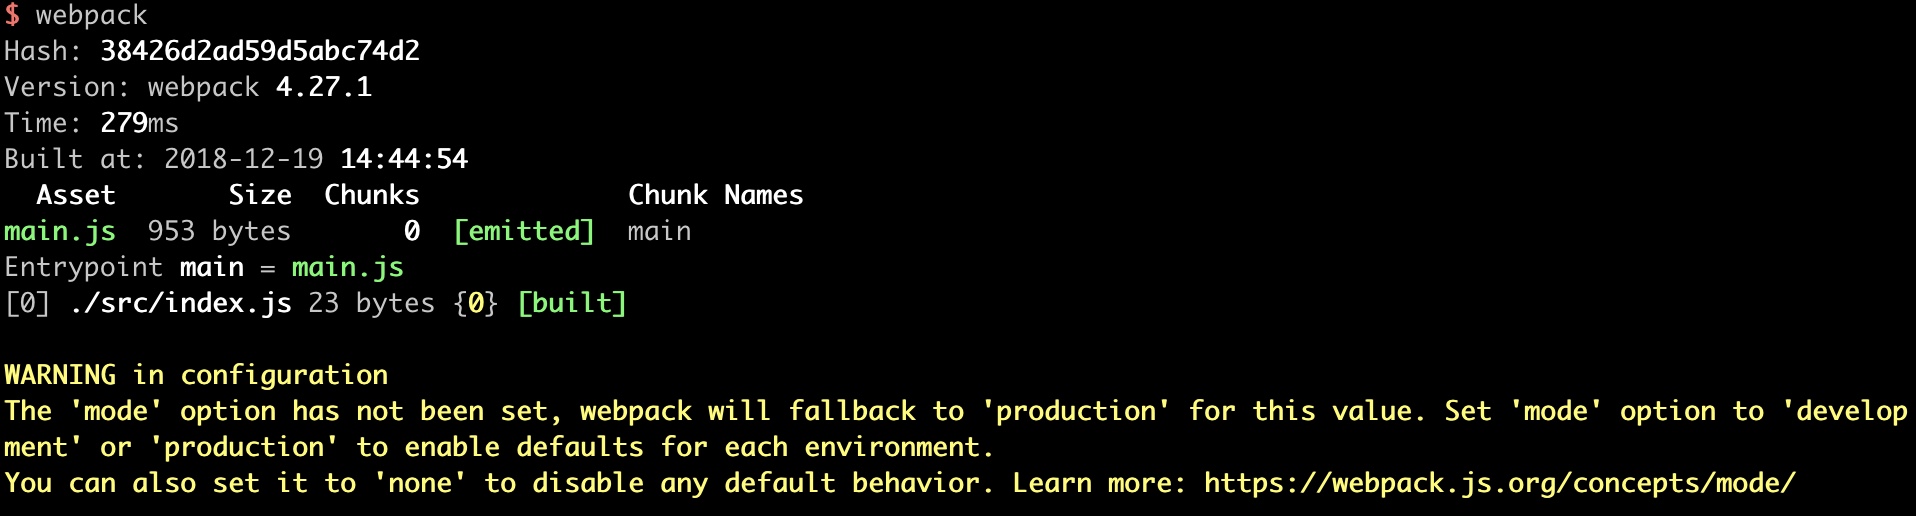
我们在 index.js 中写入了 console.log(‘index.js’)

打包完成后可以看到 dist 文件夹下多出了 main.js

Node 运行一下就可看到输出:

1
2
node dist/main.js
index.js

细心的你应该会看到终端的黄色警告提示:

1
2
3
WARNING in configuration
The 'mode' option has not been set, webpack will fallback to 'production' for this value. Set 'mode' option to 'development' or 'production' to enable defaults for each environment.
You can also set it to 'none' to disable any default behavior. Learn more: https://webpack.js.org/concepts/mode/

这是因为 webpack 打包要指定打包环境,开发以及生产环境:webpack --mode=development​ 或者 webpack --mode=production区别在于代码会不会帮你做自动压缩

接下来根目录手动创建 webpack.config.js

1
touch webpack.config.js

简单编辑下:

1
2
3
4
5
6
7
8
9
10
11
12
13
14
15
16
17
18
19
20
21
22
const path = require('path');
module.exports = {
// 打包
mode: 'development',
// 入口文件配置项
entry: {
index: './src/index.js'
},
// 出口文件配置项
output: {
// 打包路径
path: path.resolve(__dirname, './dist'),
// 打包文件名
filename: 'bundle.js'
},
// 模块:loaders加载
module: {},
// 插件配置
plugins: [],
// 配置webpack开发服务
devServer: {}
};

webpack 配置文件我们已经定义好,接下来编辑 package.json 中的 scripts 字段,让webpack 打包的时候 使用我们定义好的配置打包

1
2
3
4
"scripts": {
"test": "echo \"Error: no test specified\" && exit 1",
"build": "webpack --config webpack.config.js"
},
1
2
3
4
5
6
7
8
9
10
11
12
13
$ npm run build
> quick-start@1.0.0 dev /Users/somnus/Desktop/myproject/github/quick-start
> webpack --config webpack.config.js
Hash: 57f5ff0df67788bc0fcd
Version: webpack 4.27.1
Time: 70ms
Built at: 2018-12-19 15:04:05
Asset Size Chunks Chunk Names
bundle.js 3.79 KiB index [emitted] index
Entrypoint index = bundle.js
[./src/index.js] 23 bytes {index} [built]

查看 dist 文件夹下已经成功打包的 bundle.js 文件

接下来你可能会考虑,如果我们有多个入口呢?我们在改写一下 webpack.config.js

1
2
3
4
5
6
7
8
9
10
11
entry: {
index: './src/index.js',
app: './src/app.js'
},
// 出口文件配置项
output: {
// 打包路径
path: path.resolve(__dirname, './dist'),
// 打包文件名
filename: '[name].js'
},

继续执行 npm run dev ,结果如下:

1
2
3
4
5
6
7
8
9
10
11
Hash: 7b6921f72326bf752b36
Version: webpack 4.27.1
Time: 73ms
Built at: 2018-12-19 15:09:11
Asset Size Chunks Chunk Names
app.js 3.76 KiB app [emitted] app
index.js 3.79 KiB index [emitted] index
Entrypoint index = index.js
Entrypoint app = app.js
[./src/app.js] 0 bytes {app} [built]
[./src/index.js] 23 bytes {index} [built]

可以看到预期的文件输出。

注意:[name] 的含义就是根据入口文件的名称来进行打包

接下来安装 webpack-dev-server ,并简单配置一下

1
npm i -D webpack-dev-server
1
2
3
4
5
6
7
devServer: {
port: 3000, // 端口
open: true, // 自动打开浏览器
hot: true, // 开启热更新
overlay: true, // 浏览器页面上显示错误
historyApiFallback: true
}

同样再去 package.json 设置脚本运行

1
2
3
4
5
"scripts": {
"test": "echo \"Error: no test specified\" && exit 1",
"build": "webpack --config webpack.config.js",
"dev": "webpack-dev-server --config webpack.config.js"
},

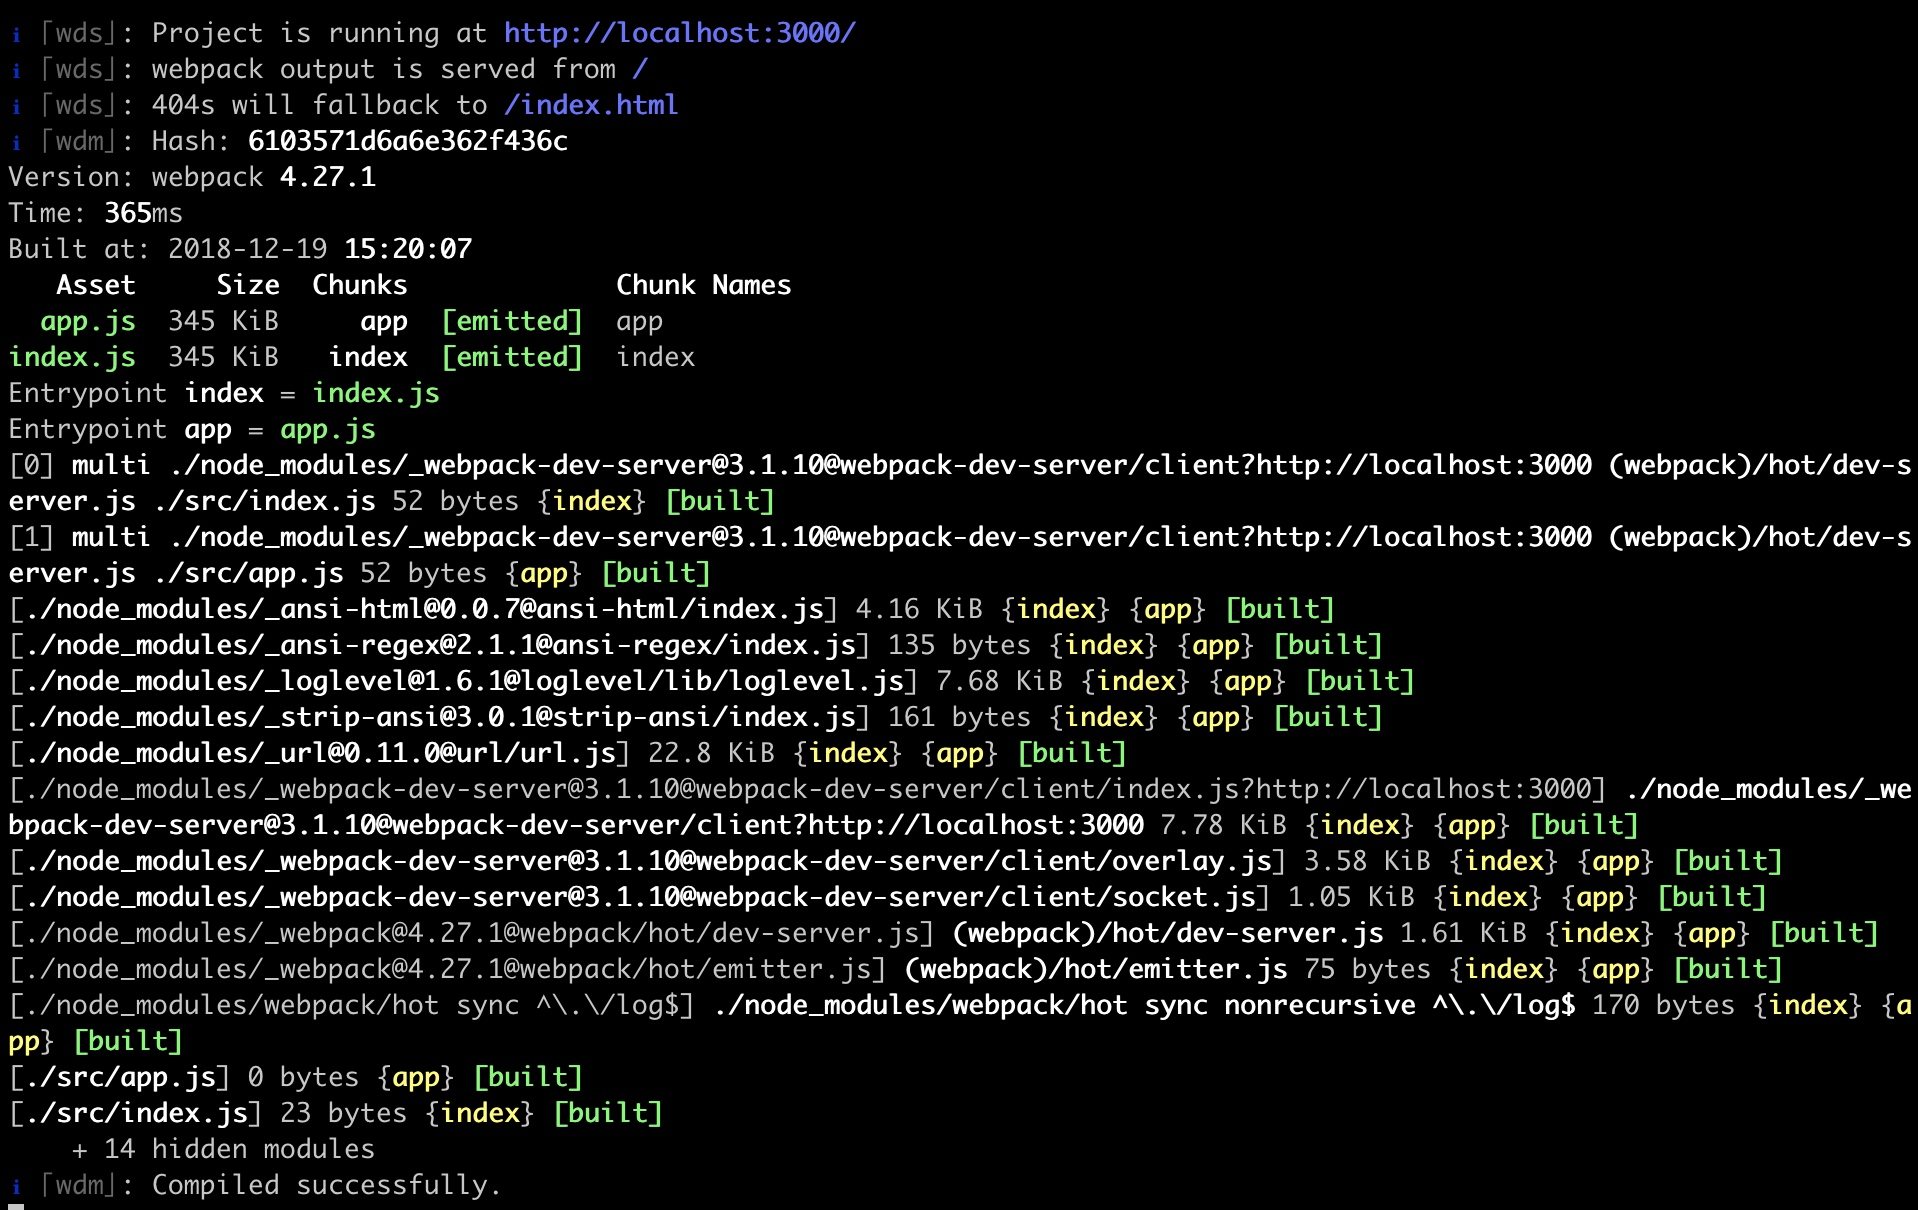
npm run dev 出现如下结果表示运行成功

FB6023E6BAB9210CF1DFF1B0003E4E18.jpg

接下来需要配置一下 html 模板,虽然webpack帮我们打包了js,但是我们不能每次都去html中引用打包生成的js吧,所以借用一个插件来帮我们实现 js 的自动引入

安装插件 html-webpack-plugin

1
npm i -D html-webpack-plugin

配置 webpack 配置(多页面)

1
2
3
4
5
6
7
8
9
10
11
12
13
14
15
16
17
18
19
20
21
22
23
const HtmlWebpackPlugin = require('html-webpack-plugin');
// 多页面配置
entry: {
index: './src/index.js', // 入口文件
admin: './src/admin.js'
},
plugins: [
new HtmlWebpackPlugin({
// html模板
template: './src/index.html',
filename: 'index.html',
chunks: ['index'],
hash: true, // 打包文件追加 hash 串
}),
new HtmlWebpackPlugin({
// html模板
template: './src/admin.html',
filename: 'admin.html',
chunks: ['admin'],
hash: true, // 打包文件追加 hash 串
})
],

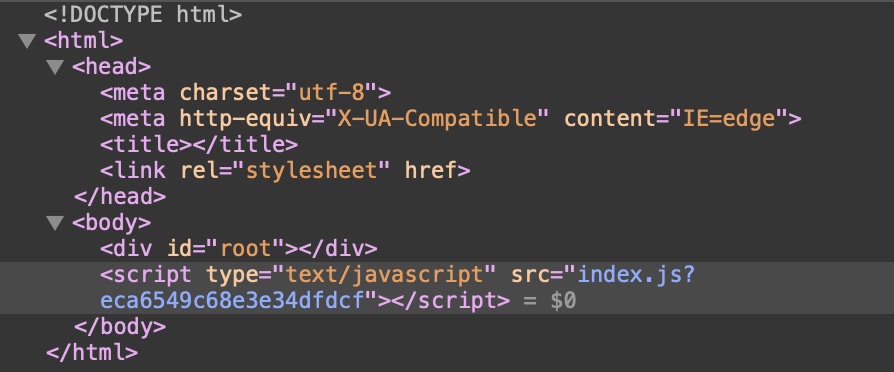
重新编译打包,审查元素会看到,已经自动帮我们吧 js 引入到了html中:

66ED359E2C01FDE44CB9283A12C649E3.jpg

loader可以针对各类引入的资源做转换加载,解析成浏览器能解析的格式

CSS loader

1
npm i -D style-loader css-loader

引入less​ 文件的话,也需要安装对应的 loader​,此处以sass为例

1
2
## npm i less less-loader -D
npm i node-sass sass-loader -D

新建 index.sass 并在 index.js 中引入

1
2
3
4
5
6
7
8
touch src/index.sass
## index.sass
body
background: red
## index.js
import './index.sass'

编辑 webpack modules 配置

1
2
3
4
5
6
7
rules: [
{
test: /\.(sc|sa|c)ss$/,
use: ['style-loader', 'css-loader', 'sass-loader'] //右向左解析
}
]
## test为匹配项 use为使用的loader

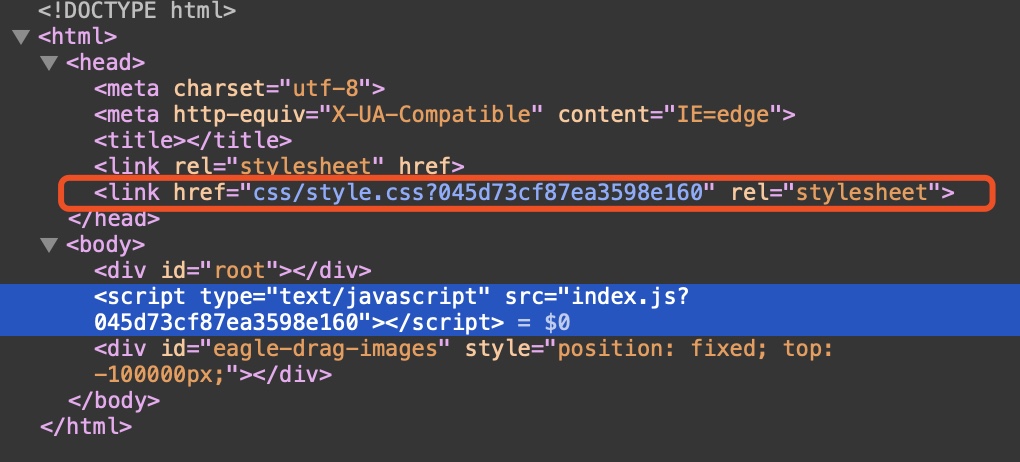
重新打包编译发现,此时打包后的 css 是以行内样式的标签引进的,我们更希望用 link 的方式引进,需要用一个插件 extract-text-webpack-plugin 插件,它功效在于将 css 文件 拆分提取

安装 extract-text-webpack-plugin 插件

1
2
// @next 表示可支持 webpack4 的版本
npm i -D extract-text-webpack-plugin@next

配置 CSS loader

1
2
3
4
5
6
7
8
9
10
11
12
13
14
15
const ExtractTextWebpackPlugin = require('extract-text-webpack-plugin')
// loader
{
test: /\.(sc|sa|c)ss$/,
use: ExtractTextWebpackPlugin.extract({
// css link 方式引入就不需要 style-loader
fallback: 'style-loader',
use: ['css-loader', 'sass-loader'] //右向左解析
})
}
// plugins中定义
// 拆分后会把css文件放到dist目录下的css/style.css
new ExtractTextWebpackPlugin('css/style.css')

webpack 4 采用mini-css-extract-plugin

1
2
3
4
5
6
7
8
9
10
11
12
13
14
15
npm i -D mini-css-extract-plugin // for webpack 4
// webpack.config.js
const MiniCssExtractPlugin = require('mini-css-extract-plugin')
// loader
{
test: /\.(sc|sa|c)ss$/,
use: [MiniCssExtractPlugin.loader, 'css-loader', 'sass-loader'] //右向左解析
}
// plugins
new MiniCssExtractPlugin({
filename: 'css/style.css'
})

重新打包编译,查看页面如下:

9F1136D03A04E1C8E6095A2E246BEFB9.jpg

同理 图片引用 我们需要用到 file-loader 和 url-loader

1
2
3
4
5
6
7
8
9
10
11
12
13
14
npm i -D file-loader url-loader
{
test: /\.(jpe?g|png|gif)$/,
use: [
{
loader: 'url-loader',
options: {
limit: '8192', // 小于8k自动转成base64,不会存在实体图片
outputPath: 'images' // 打包存放目录
}
}
]
}

页面 img 标签 引用图片

1
2
3
4
5
6
npm i -D html-withimg-loader
{
test: /\.(htm|html)$/,
use: 'html-withimg-loader'
}

引用字体和svg 可以用 file-loader

1
2
3
4
{
test: /\.(eot|ttf|woff|svg)$/,
use: 'file-loader'
}

基本的引用就差不多这些,接下来需要对 CSS 做一些优化

例如:我们想自动根据浏览器来为我们声明的 CSS3 添加兼容前缀,我们需要用到:

postcss autoprefixer

1
2
3
4
5
6
7
8
9
10
11
12
13
14
15
16
17
18
19
20
21
22
23
24
25
26
27
28
// 一如既往的安装
npm i -D postcss-loader autoprefixer
// 项目根目录创建 postcss.config.js
touch postcss.config.js
// 文件中写入
module.exports = {
plugins: [
require('autoprefixer')({
"browsers": [
"defaults",
"not ie < 11",
"last 2 versions",
"> 1%",
"iOS 7",
"last 3 iOS versions"
]
})
]
};
// 配置 loader
// postcss-loader 加在css-loader后
{
test: /\.(sc|sa|c)ss$/,
use: [MiniCssExtractPlugin.loader, 'css-loader','postcss-loader', 'sass-loader'] //右向左解析
}

CSS 模块化

1
2
3
4
5
6
7
8
9
10
11
// 配置css loader
{
loader: 'css-loader',
options: {
module: true,
importLoaders: 1,
localIdentName: '[name]_[local]_[hash:base64]',
sourceMap: true,
minimize: true
}
},

要启用 CSS 模块化,我们需要设置 css-loader 的 module 选项为 true。

importLoaders 选项表示在 css-loader 之前应用多少个加载器。

例如,sass-loader 必须先于 css-loader 出现。localIdentName 允许配置生成的标识:

  • [name]:css 文件名称
  • [local]:类/id 的名称
  • [hash:base64]:随机生成的 hash,它在每个组件的 CSS 中都是唯一的

消除未使用的css

1
2
3
4
5
6
7
8
9
10
11
12
13
14
15
// 安装PurifyCSS-webpack
npm install --save-dev purifycss-webpack purify-css
// 在webpack.config.js中引入glob
const glob = require('glob');
// 在webpack.config.js中引入purifycss-webpack
const PurifyCSSPlugin = require("purifycss-webpack");
//配置webpack.config.js中的plugins
plugins:[
new PurifyCSSPlugin({
paths: glob.sync(path.join(__dirname, 'src/*.html')),
})
]

测试一下,在引用的css中定义一个未使用的样式声明,编译打包后查看编译后的css 文件,是不是已经被清除了

babel7 转义ES6和react

笔者使用的 babel7 ,接下来安装

1
npm i -D babel-loader@8 @babel/core @babel/preset-env @babel/preset-react
  1. babel-loader:使用 Babel 转换 JavaScript依赖关系的 Webpack 加载器
  2. @babel/core:即 babel-core,将 ES6 代码转换为 ES5
  3. @babel/preset-env:即 babel-preset-env,根据您要支持的浏览器,决定使用哪些 transformations / plugins 和 polyfills,例如为旧浏览器提供现代浏览器的新特性
  4. @babel/preset-react:即 babel-preset-react,针对所有 React 插件的 Babel 预设,例如将 JSX 转换为函数
1
2
3
4
5
6
7
8
9
10
11
12
13
14
15
16
// 根目录创建babel配置文件
touch .babelrc
// 简单配置
{
"presets": ["@babel/preset-env", "@babel/preset-react"]
}
// 配置 loader
{
test: /\.js$/,
exclude: /node_modules/,
use: {
loader: 'babel-loader'
}
}

清理 dist 文件夹

每次 build 之后都会重新生成文件至 dist 文件夹,我们需要每次 编译后自动清除 dist 文件夹内容,借助插件 clean-webpack-plugin

1
2
3
4
5
6
7
8
9
10
npm i -D clean-webpack-plugin
let CleanWebpackPlugin = require('clean-webpack-plugin');
module.exports = {
plugins: [
// 打包前先清空
new CleanWebpackPlugin('dist')
]
}

提取公共代码

1
2
3
4
5
6
7
8
9
10
11
12
13
14
15
16
17
18
19
20
21
22
23
24
25
26
//在webpack4之前,提取公共代码都是通过一个叫CommonsChunkPlugin的插件来办到的。到了4以后,内置了一个一模一样的功能 optimization
optimization: {
splitChunks: {
cacheGroups: {
vendor: { // 抽离第三方插件
test: /node_modules/, // 指定是node_modules下的第三方包
chunks: 'initial',
name: 'vendor', // 打包后的文件名,任意命名
// 设置优先级,防止和自定义的公共代码提取时被覆盖,不进行打包
priority: 10
},
utils: {
// 抽离自己写的公共代码,utils里面是一个公共类库
chunks: 'initial',
name: 'utils', // 任意命名
minSize: 0 // 只要超出0字节就生成一个新包
}
}
}
},
// 还要在plugins里面引入需要单独打包出来的chunk
new HtmlWebpackPlugin({
template: './src/index.html',
chunks: ['vendor', 'index', 'utils'] // 引入需要的chunk
}),

配置 dev-server

1
2
3
4
5
6
7
devServer: {
port: 3000, // 端口
open: true, // 自动打开浏览器
hot: true, // 开启热更新
overlay: true, // 浏览器页面上显示错误
historyApiFallback: true
},

devtool优化

1
2
// 在开发环境下配置
devtool: 'eval-source-map'

热更新

1
2
3
4
5
6
7
8
9
10
11
12
13
14
15
16
17
18
19
// webpack.config.js
let webpack = require('webpack');
module.exports = {
plugins: [
// 热更新,热更新不是刷新
new webpack.HotModuleReplacementPlugin()
],
devServer: {
hot: true, // 加上这一行
}
}
// 在入口文件index.js
// 还需要在主要的js文件里写入下面这段代码
if (module.hot) {
// 实现热更新
module.hot.accept();
}

webpack merge

1
2
3
4
5
6
7
8
9
10
11
12
13
14
15
16
17
18
19
const path = require('path')
const webpack = require('webpack')
const merge = require('webpack-merge')
const common = require('./webpack.common')
module.exports = merge(common, {
plugins: [
new webpack.HotModuleReplacementPlugin(),
],
mode: 'development',
devServer: {
port: 3000, // 端口
open: true, // 自动打开浏览器
hot: true, // 开启热更新
overlay: true, // 浏览器页面上显示错误
historyApiFallback: true
},
devtool: 'eval-source-map',
})

eslint

统一的代码风格对于团队合作不可或缺。

1
2
3
4
5
6
7
8
9
10
11
12
13
14
15
16
17
18
19
20
21
// 安装 eslint
npm --save-dev install eslint
// 因为我们使用了webpack,所以必须要告诉webpack我们在构建时使用eslint,安装eslint-loader
npm --save-dev install eslint-loader
// 配置loader
{
test: /\.js$/,
exclude: /node_modules/,
use: ['babel-loader', 'eslint-loader']
},
// 同理根目录创建配置文件
touch .eslintrc
// 编辑 .eslintrc
{
"rules": {
}
}

稍后我们可以在该文件中指定规则,但首先我们要在Webpack配置文件中引入该文件。

plugins中定义:

1
2
3
4
5
6
7
8
new webpack.LoaderOptionsPlugin({
// test: /\.xxx$/, // may apply this only for some modules
options: {
eslint: {
configFile: './.eslintrc'
}
}
})

添加完成运行会发现 ES6 语法会报错

我们可以通过 babel-eslint 来检测ES6代码

1
2
3
4
5
6
7
8
9
// 安装 babel-eslint
npm install --save-dev babel-eslint
// 修改.eslintrc
{
parser: "babel-eslint",
"rules": {
}
}

添加规则

1
2
3
4
5
6
7
8
{
"parser": "babel-eslint",
"rules": {
"max-len": [1, 120, 2, {"ignoreComments": true}]
}
}
// 安装 react lint
npm install -D eslint-plugin-react

安装之后,我们可以使用react插件来指定我们关于react的第一条代码规则。比如我们要求组件指定PropTypes

1
2
3
4
5
6
7
8
9
10
11
12
13
14
15
16
17
18
19
20
21
22
23
24
25
26
27
28
29
30
31
32
33
34
35
36
37
38
39
40
41
42
43
44
45
46
47
48
49
50
51
// .eslintrc
{
parser: "babel-eslint",
"plugins": [
"react"
],
"rules": {
"max-len": [1, 120, 2, {ignoreComments: true}],
"prop-types": [2]
}
}
// 扩展ESLint规则 Airbnb Style Guide
npm install -D eslint-config-airbnb eslint-plugin-import eslint-plugin-jsx-a11y
// 修改.eslintrc配置
{
"parser": "babel-eslint",
"extends": "airbnb",
"rules": {
"max-len": [1, 120, 2, {"ignoreComments": true}],
"prop-types": [2]
}
}
// 调整
{
"parser": "babel-eslint",
"extends": "airbnb",
"plugins": [
"react",
"jsx-a11y",
"import"
],
"rules": {
"max-len": [1, 120, 2, {"ignoreComments": true}],
"prop-types": [0],
"no-console": 1,
"react/jsx-filename-extension": [1, { "extensions": [".js", ".jsx"] }]
},
"env": {
"browser": true,
"node": true
}
}
// bug
Resolve error: unable to load resolver "node"
// 解决方案
npm install -D eslint-import-resolver-node

pre-commit

git pre-commit 提交前检测 如果检测失败则禁止提交。可以在很大一定程度上保证代码质量

1
2
3
4
5
6
7
8
9
10
11
12
// pre-commit hook
"scripts": {
"eslint": "eslint --ext .js src"
}
// 安装
npm i -D pre-commit
// package.json:
"pre-commit": [
"eslint"
]
显示 Gitment 评论